30 Nov 2015
In the previous iteration of this blog, I wrote a lot of words. There are some posts from back then that run to thousands of words, and some of those posts are broken up into thousands-of-words parts.
Part of this is that I am a writer, and I think in words. Part of it is that I just can’t shut up.
But I recognize that these days the web is all about the images, and endless walls of text are just TL;DR (too long; didn’t read).

So, I’ve been taking more pictures.
I am not a photographer. I have never been a photographer. I’ve taken tons of
photographs, but only in the sense that I point a cheap camera at something and click the button, and sometimes it comes out looking OK. I am exactly what used to be derisively referred to on flickr (back when flickr was cool) as a “snapshotter.”
Like nearly everyone else in the last ten years I stopped bothering to carry a camera at all, and now I just take pictures with my phone. And my phone — a two-generations-old iPhone 5S, no less — has been totally acceptable for snapshotter photos, and even not half bad at all with the kind of arty semi-blurry close-up photos of food and plants that one puts on a blog. People have actually said nice things about my iPhone photos. Success achieved with semi-adequate tools and shameless copying! Yay!
But I’d like to do better, and maybe actually learn something about how photography works. Then there was a sale on Woot.com, and I bought a Canon EOS T5i. It’s my first real camera, and my first DSLR.
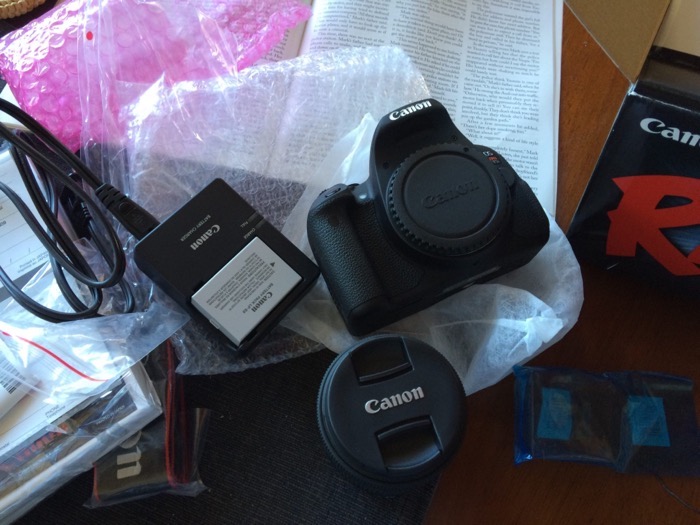
I do feel like I have an awful lot to learn before I’m even vaguely competent with it, but I’ve been taking pictures for the last few weeks and they’re not too awful. And the UI on the camera is set up so that you can put it in the most basic mode and be vaguely competent even if you don’t know what you’re doing.
Stay tuned for more and better arty semi-blurry close-up photos of food and plants. (And too many words, too)
25 Nov 2015
Whoops, had not intended for the whole week to go by without a post.

18 Nov 2015
I hear this is a thing bloggers do these days.
17 Nov 2015
(First, go read yesterday’s post about Garlic Prep)
24 hours after breaking the garlic bulbs into cloves and setting them to soak, it’s time to plant the garlic in the garden.
I actually started soaking my garlic on Sunday, and it’s Tuesday now. So it’s been more than 24 hours, and I am once again behind. Things will still be fine. Planting and gardening is not really a precise science.
Spacing The Garlic
Looking back at my garden journal, in the past I’ve planted garlic as tightly as three inches apart, and as far as eight. The closer you plant the cloves the less room they will have to grow into big bulbs, and they’ll need more water. Farther apart and you’ll need to weed more, and it’s not like the garlic will grow a foot wide if you give them that much space. Four inches seems to be a happy medium, and what I’ve used most often in the past.

I’m using a 3-foot by 8-foot garden bed this year for the garlic. Four-inch spacing means 24 rows of 9 cloves. That’s room for 216 cloves in this single bed, and that is a lot (a LOT) of garlic. The two pounds of garlic I cleaned and soaked a day ago gave me 106 cloves. They’re also extra large cloves, so I’ll loosen up the spacing a little more so the cloves have room to grow — 4 inches between cloves, and 5 inches between the rows. That will fill a large portion of the bed with the cloves that I have, with some extra space as well.
Garlic doesn’t care if it’s planted in neat orderly rows, or squares, or diamonds, or spirals, or smiley faces. You can stuff it into the ground roughly 4 inches apart and it’ll grow. I like rows because nerd. It’s more organized that way.
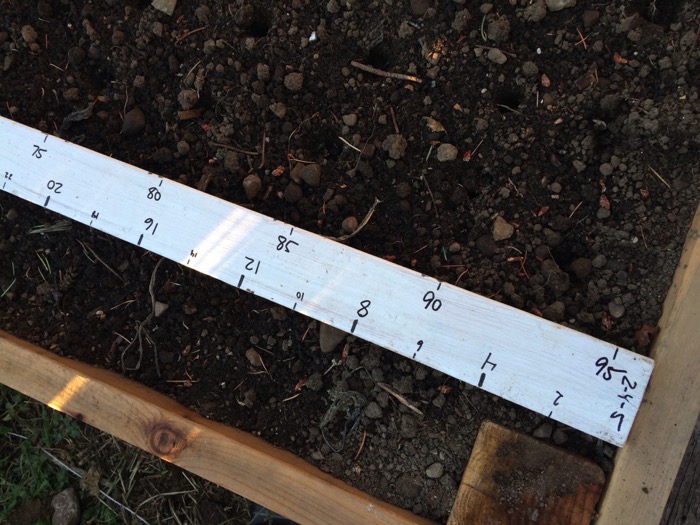
To keep track of spacing for planting my beds I made this enormous ruler. One side is marked in 2, 4, and 5 inches, and the other side has 3, 6, 8, and 12. It’s eight feet long so it fits neatly into the bed for measuring, and helps keep the rows straight.
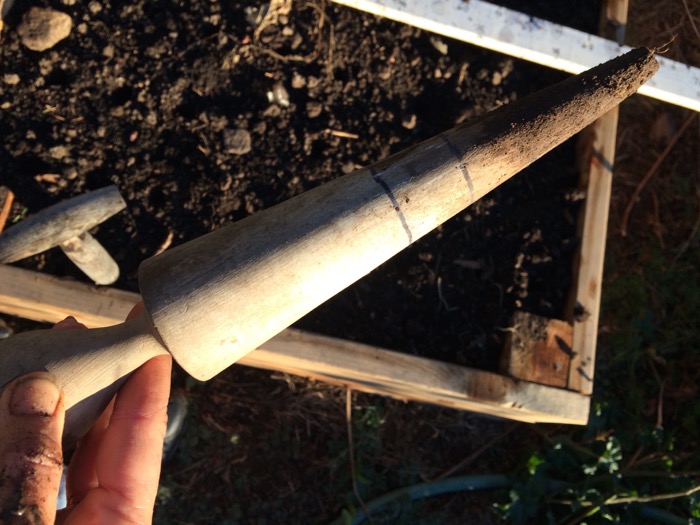
This is a garden tool called a dibble or a dibbler. It is useful for poking holes for planting individual seeds — or planting garlic cloves. I have marked it in 1-inch increments so that I know how deep to make the holes.
(Technically, this is not a dibbler at all. This is actually the pestle from a cooking sieve called a chinois, which I got in a random box of old kitchen stuff I picked up somewhere ages ago. But I use it as a dibbler.)
I use the dibbler first to mark the planting locations in rows for the garlic, and to make sure I have my math right for the spacing. I’ll use it again to actually put the cloves into the ground.
Interlude, with Turkeys
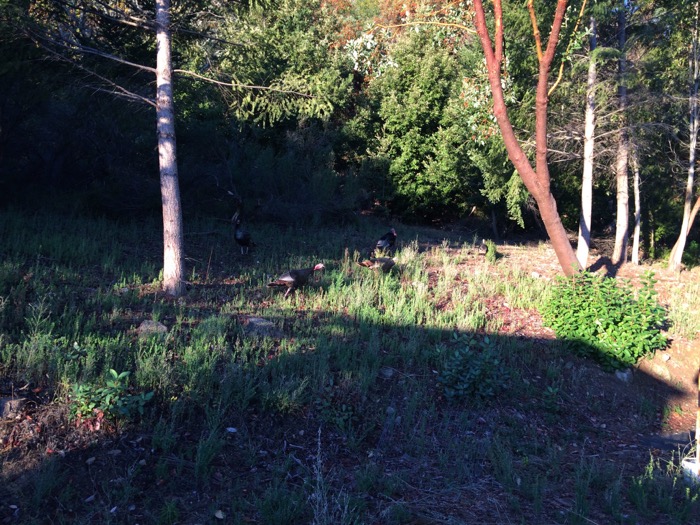
While I was marking rows in the garden and taking pictures for this post, this flock of wild turkeys came by to watch. I did not know they were there until they suddenly all gobbled at me at once. I was so startled I think I lost a full year off my life.
Planting the Garlic
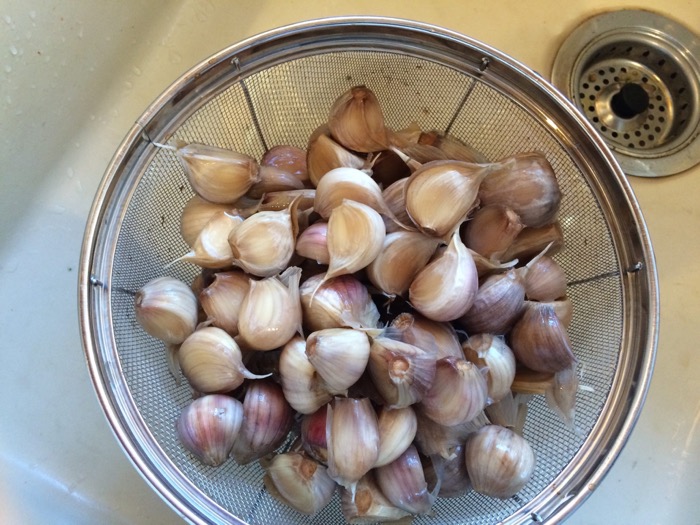
The garlic has been soaking in the baking soda and seaweed solution overnight, or in my case for close to two days. Drain the garlic in the sink. You’ll notice that the skins are really loose on the garlic cloves, and may have come off altogether. That’s OK; you can even plant the cloves without the skins at all and they’ll still do fine.
Part two of the soaking strategy involves rubbing alcohol for a final short disinfection. I haven’t ever done this before, so I have no idea if it will make a difference at all, but I’m willing to try.
I put the garlic back into the soaking container, add half a bottle of rubbing alcohol and water to cover. Shake to distribute, leave for a couple minutes, and then drain again. Now we’re ready to plant.
I haven’t done anything special to the soil in the garden bed to prepare it for garlic. Garlic likes loose soil, and it likes some extra phosphorus. If my soil was in poorer condition I would have added bone meal and a bunch of compost when I dug the bed. But this soil came from another bed in the garden, and it is already in good condition and pretty fluffy.
You can plant garlic anywhere from 1 to 3 inches deep, depending on the size of the cloves. If you’re planting smaller cloves and your soil is fluffy you can just press them into the soil with your fingers. (The first joint on my thumb is almost exactly 1 inch, which is awfully convenient.) Because these are big cloves I used the dibbler to poke 2-3 inch deep holes and then dropped in the cloves.
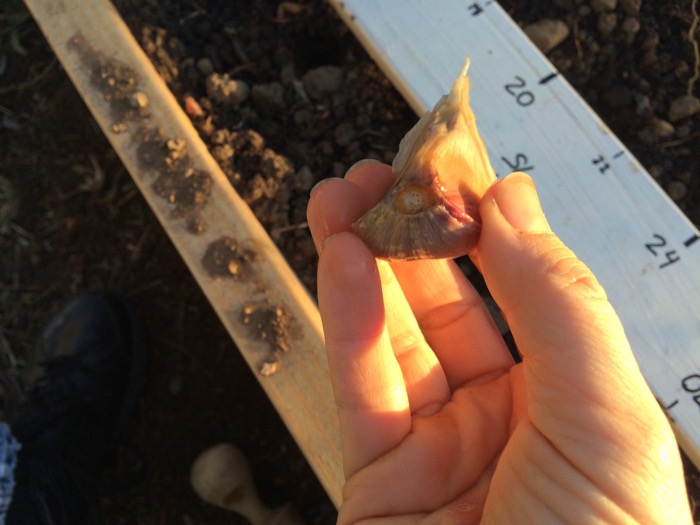
You do want to plant the cloves root side down, and pointy side up. These cloves have very obvious root sides and pointy sides, but sometimes with some softneck garlic cloves it can be harder to tell. If you plant them upside down or sideways they will grow but it’ll take longer for them to figure out which way is up, and you’ll probably get smaller bulbs. This somewhat unfortunate picture that looks like something else entirely shows the root end of the clove.
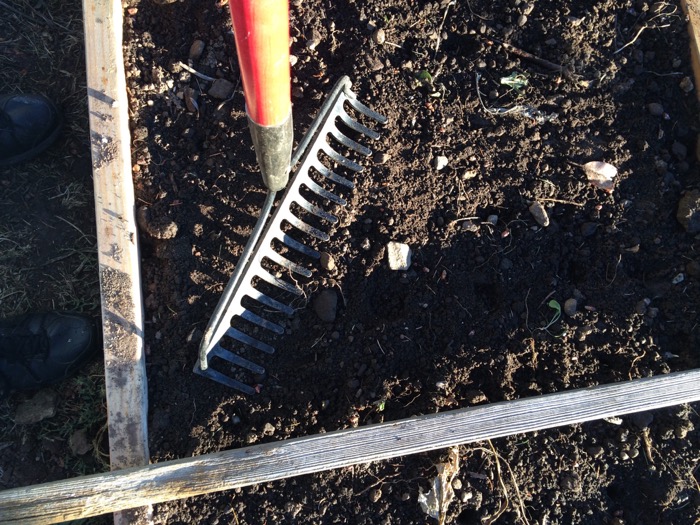
After all the garlic is planted, I press down the soil lightly to make sure that there is good contact between the soil and the cloves. You can just use your hands for this, but I use a rake.
Mulching the Garlic
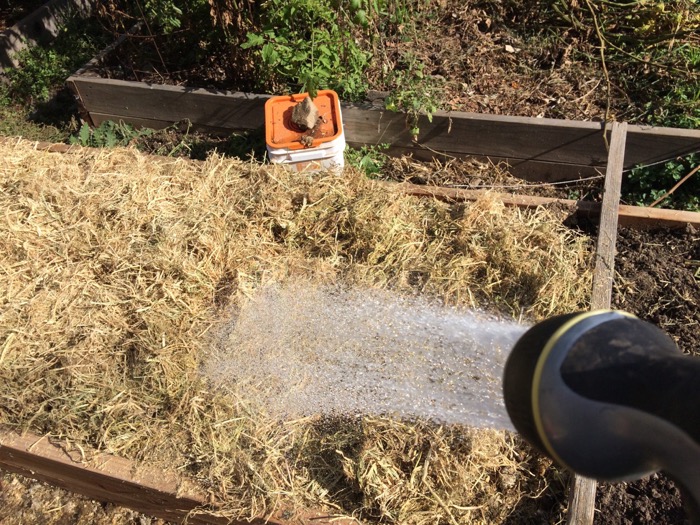
The final step is a thick layer of mulch on the garden bed — two to three inches of mulch. The mulch helps preserve moisture in the soil, protects the new garlic shoots from the freezing over winter, and also prevents marauding birds from noticing that your garlic is sprouting, mistaking the sprouts for worms, and yanking all the cloves out of the ground. (Don’t ask me how I know this happens.)
For mulch I’ve used leaves, straw, pine needles, or compost, depending on what’s available in my yard at the time. This year I used some composted chicken litter (I have a LOT of chicken litter) and a layer of straw. The chicken litter is high in nitrogen and will help fertilize the garlic as it grows, and the straw is just mulch. All you have to do is lay it on, and water it down.
Normally when I plant garlic I also put in the irrigation lines, underneath the mulch. If we get rain this year I won’t need to water the garlic until the spring, but it’s good to put in the lines before anything sprouts and makes it more difficult. Putting the lines under the mulch helps preserve water later in the year. However, this is a new bed, and I haven’t run any of the lines at all yet. I’ll have to do that later on in the Fall or Winter when I get around to it.
And that’s the job done. Other than peeking under the mulch occasionally the winter to see if things are sprouting, there’s nothing else to do with the garlic until sometime next Spring.
16 Nov 2015
My 2016 vegetable gardening season has begun.
Garlic in Northern California is sometimes called the holiday vegetable. You plant garlic on Halloween, fertilize on Valentine’s Day and harvest on July 4. With fall-planted garlic the bulbs sprout and grow all through the winter with no trouble (they can even freeze solid and keep going) and get a good head start when things warm up in spring time.
I’m running a little late with my garlic, but I’ve planted as late as Christmas and still gotten good results, so I’m not that anxious about it. The delay was because I was putting in this lovely new garden bed and filling it with soil:
Garlic Varieties
I’ve experimented growing both softneck and hardneck garlic over the years, and I’ve found that for me hardnecks grow better (larger bulbs), but softnecks keep longer after harvesting. Normally I try to grow both kinds so that I can have garlic for cooking year-round.
Softneck garlic is the kind you buy in the store and may be the only kind you’ve ever seen. Most varieties of commercial garlic is either California Early or California Late. Although I live near Gilroy, CA, the garlic capital of America, I have had no luck at all with growing either of these varieties. For softneck garlic I usually grow an heirloom variety called Lorz Italian, originally from the Pacific Northwest. This variety grows well for me, keeps well, and tastes great.
For hardneck garlic I grow Music. The Music variety is really reliable and can grow monstrously huge if the conditions are right. I’ve grown other hardneck varieties over the years but Music performs so well that I’ve given up on everything else.
Normally I save some of my own garlic to plant every year, but last year I had trouble with root rot in the plants. Root rot is caused by a fungus in the soil. I don’t want to replant my old bulbs and possibly spread the fungus all over my garden, so this year I bought two pounds of certified disease-free new garlic bulbs. I often buy my garlic from Peaceful Valley Farm Supply, my favorite online garden store, although they don’t carry the softneck Lorz Italian I like. Rather than seek out a second garlic supplier I got lazy and this year I am planting my entire bed with Music.
Preparing for Planting: Separating the Cloves
The day before I want to plant garlic (yesterday, in this case), I separate the cloves from the bulb and give them a good soak over night in an anti-fungal solution.
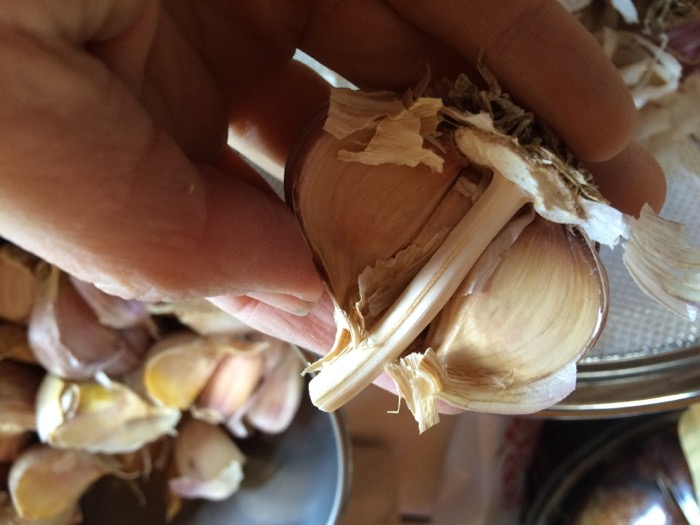
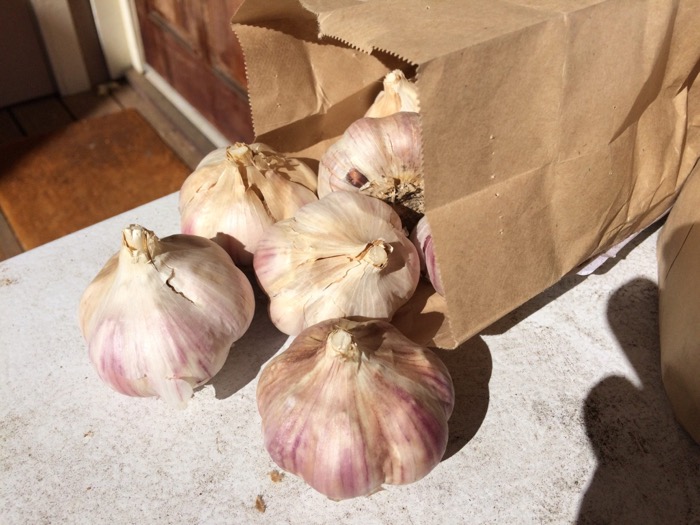
This is what a Music bulb looks like on the inside. With the hardneck garlic varieties there is a stiff stem in the middle of the bulb, and then just 6-8 large cloves all the way around. Softnecks, in comparison, often have little skinny cloves in the heart of the bulb. Although you can plant those skinny cloves, you’ll end up with smaller bulbs as a result. Start with the largest cloves to end up with the largest bulbs.
The end result from the 2lbs of garlic bulbs I bought: 106 cloves, which is less than I expected — the Music bulbs were especially large this year. The bed I’m planting these in will hold 200 cloves, so I’ll have some extra space.

Preparing for Planting: An Overnight Soak
For years I just stuck my garlic cloves into the ground immediately after separating them from the bulb, with no problems. But since I have had fungus issues in my garden beds over the last few years, I soak my garlic overnight before planting in an anti-fungal solution. It doesn’t cure the fungus (which is resident in the soil), but it can help the garlic resist having problems if the fungus is there.
The general soaking advice for garlic I found online when I started doing this is 1 tablespoon of baking soda and 1 tablespoon of liquid seaweed to a gallon of water. The baking soda is for anti-fungal properties, and the seaweed provides a small amount of fertilizer. It creates this lovely dark-brown soup.
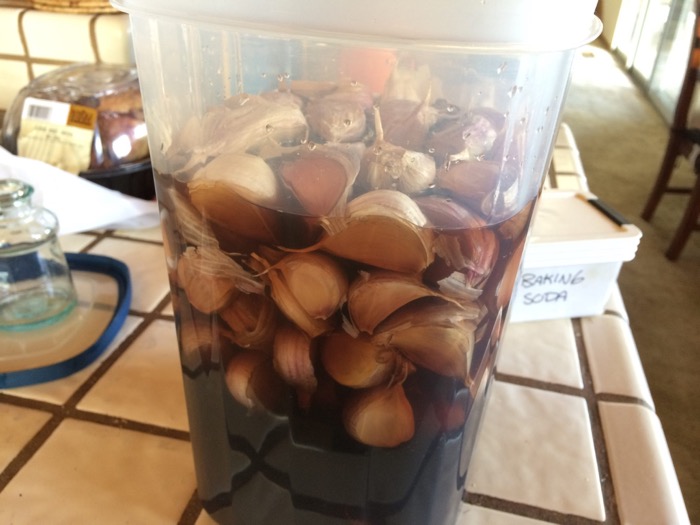
I weight down the cloves in the solution to keep them submerged and leave the container out on the back porch overnight. In 20-24 hours the garlic will go into the ground and start on the path to being next year’s food.
(Next: Garlic Planting)
16 Nov 2015
Yesterday Twitter user @tfofurn asked to repost the photo I took of the stick in my Mac laptop fan on the Pareidolia reddit. Why? Because “I see a face in your fan hub.”
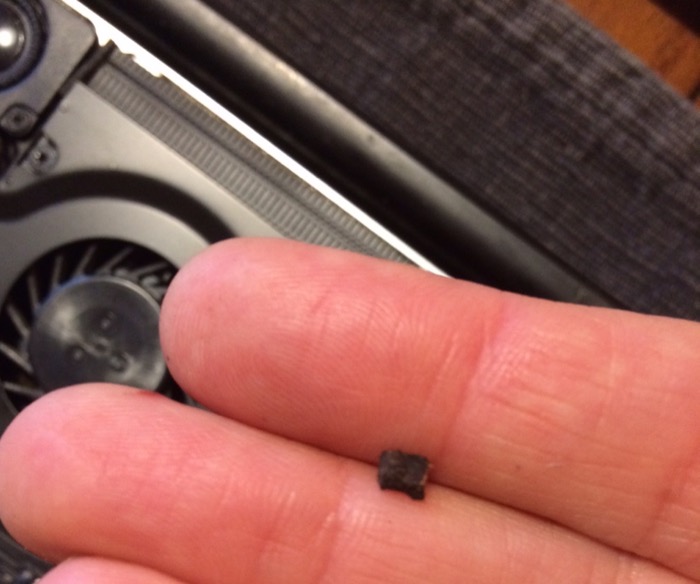
Yikes! I had not spotted that at all until @tfofurn mentioned it.
Perhaps this explains why I’ve been having so much trouble with this laptop lately. It’s not that it’s five years old and ready to go. It’s that it’s haunted.
10 Nov 2015
Last weekend while I was sitting on the couch throwing away my life on the Internet my Macbook laptop made a noise like CRRRZZZZGGHH, and then fell silent.
“Uh,” I said. “That didn’t sound good.”
“Sounds like your fan died,” Eric said.
The fan had been making noise for a while now. Eric had joked that he can tell when I’m watching online video because my Mac starts to sound like a jet plane taking off.
I downloaded a little tool called smcFanControl that polls the fan sensor and reports how fast the fan is turning and what the current laptop temperature is. smcFanControl reported that my fan was turning at 000rpm, and that the temperature was 210ºF and climbing.
I’ve repaired this laptop a bunch of times already including replacing DVD drive, the trackpad, and the battery. It’s an older model (2011!) but other than the jet plane problem, it works just fine. At this point I’m quite familiar with opening up the box, and I’d like to make it last just a little bit longer before investing in a new one.
I ordered a new fan, which cost me $20 with free shipping from an Amazon seller. I watched a YouTube video on how to replace the fan. (Easy peasy.) The new fan arrived yesterday, and this morning I opened up the box to do the swap.
There was something stuck in the fan. I picked it out with my fingers. It was a stick.
After I removed the stick the fan turned just fine. I booted up the computer. The fan turned and turned and smcFanControl reported 3050rpm.
Huh.
The laptop is silent now, it’s under 100º all the time, and now I have an extra fan. Success!
05 Nov 2015
It’s November, and the weather in the bay area just this week turned cold and damp and dark, which means the end of the summer garden is coming up fast.
My large vegetable garden is just outside the back door next to the kitchen. The garden is big enough that it supplies nearly all of of our vegetables in the summer time. It keeps me busy on weekends all spring and summer long, digging and digging (and digging, and digging), and then cooking and canning and freezing. Sometimes I think that I need a hobby that requires less time moving dirt around or spending hours standing in front of a pot in the kitchen. A nice relaxing indoor hobby, maybe something involving JavaScript.
But then sometime in January I pull some pesto out of the freezer or pop the lid on a can of tomatoes, and we eat a little bit of summer for dinner.
Many of my east coast gardening friends put their gardens to bed weeks ago, but the growing season in Northern California is long and mild. I’ve had years where I was still pulling red tomatoes off the vine well into November, and once or twice even up to Christmas.
This is not one of those years. It’s been a dry summer after a series of very dry years, and I’ve been trying to water the garden as little as possible, which means smaller plants and less yield. With little else to eat this Fall the birds have been raiding the tastier bits of the garden. The tomatoes and cucumbers and melons and green beans are long gone, and as the nights turn colder the squash dies back and the basil gets a bitter taste.
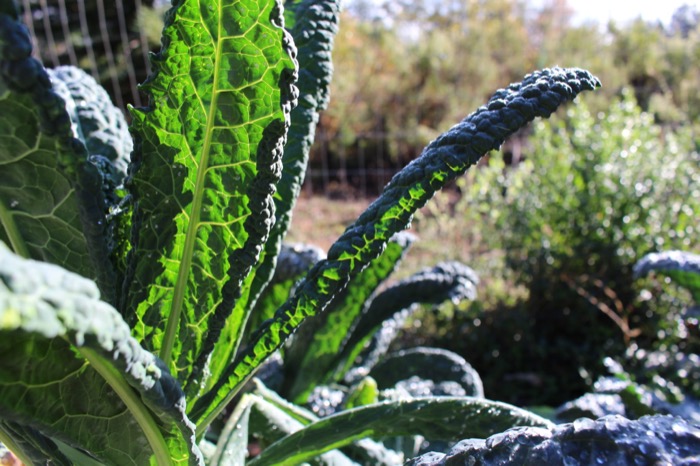
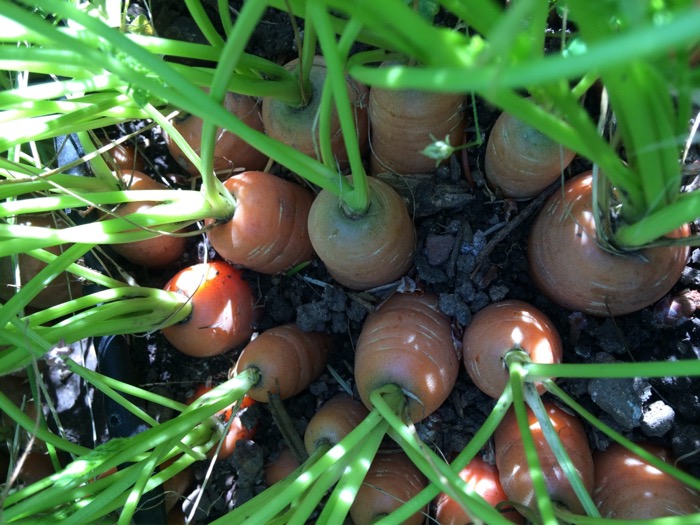
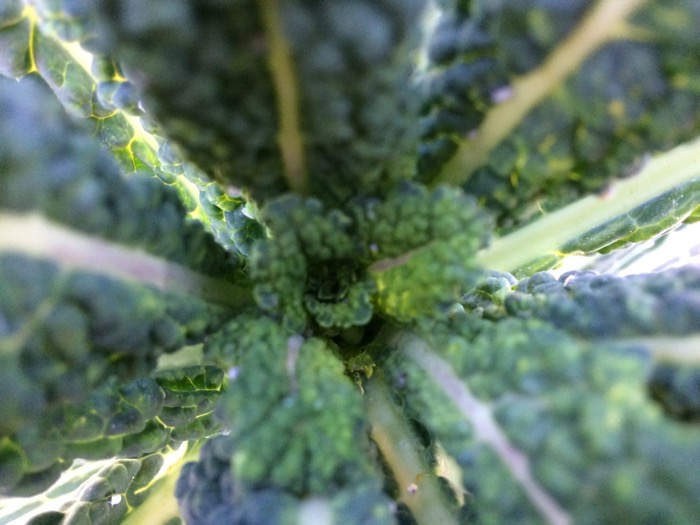
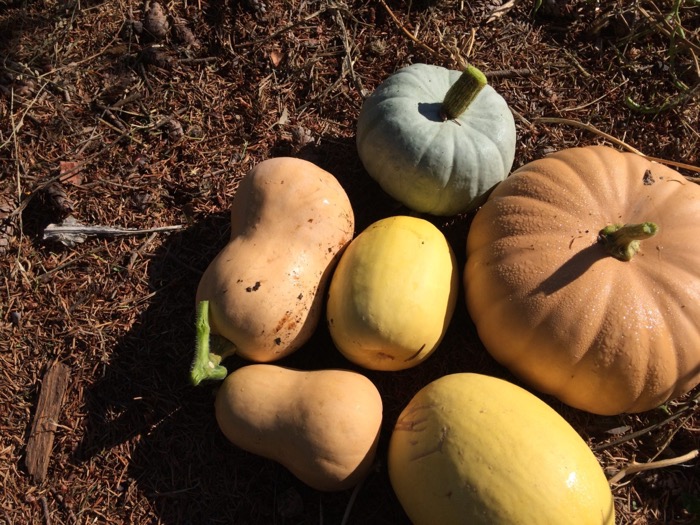
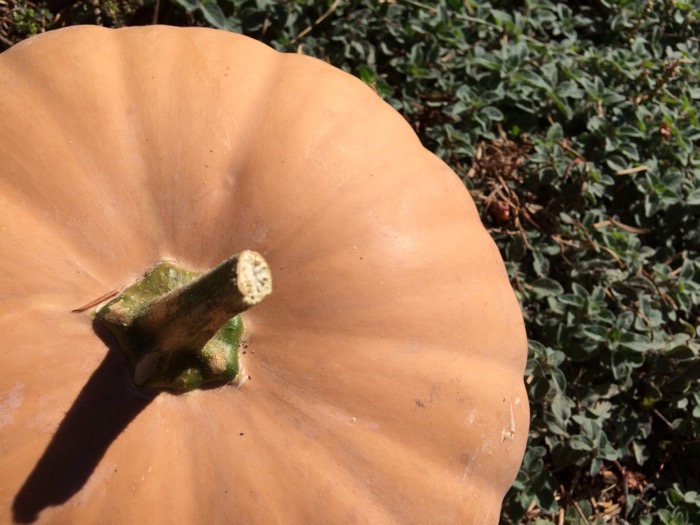
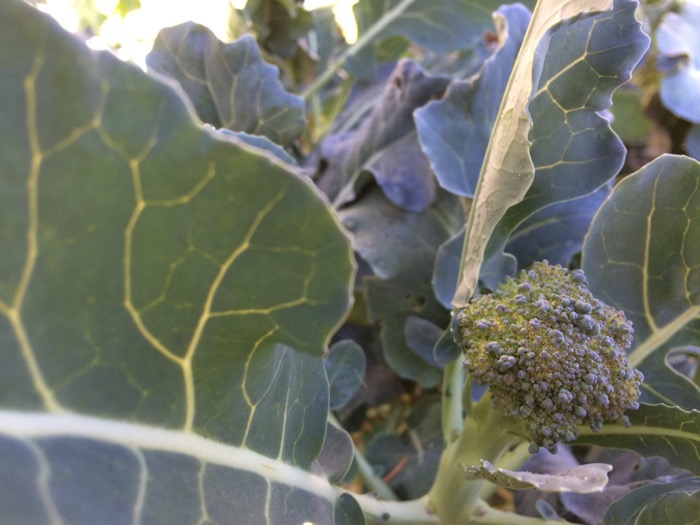
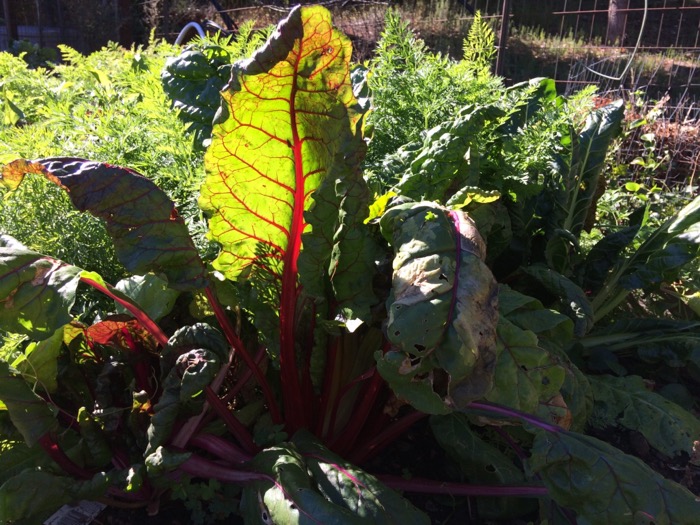
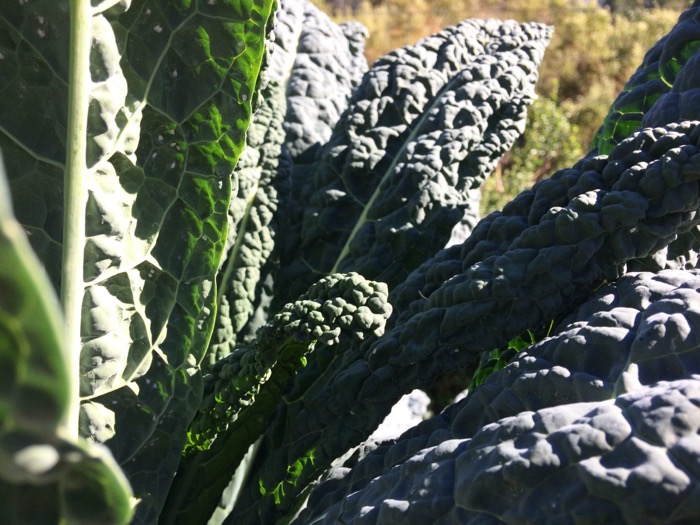
What’s left now in the garden are vegetables that thrive in cooler weather: kale and chard, broccoli, carrots, lettuce, spinach, and peas. All of these will continue growing through the winter, and sometimes well into next year. I have a handful of pumpkins and winter squash that still need to be picked and cured and stored alongside the onions and garlic in the barn.
But even as the summer garden closes, I’ve already started the garden for next year. This week I have an open bed in the garden to weed and dig and compost, and then more than 200 cloves of garlic will go in for next year.
01 Nov 2015
I am planning to write this month, and I hope to write a huge pile of words this month. Maybe even a book-shaped pile of words. Lots of words. Yeah.
But I’m not doing NaNoWriMo. I’m not on the forums, I’m not going to writing meetups, and I don’t have daily word count goals.
In the past when I’ve tried NaNoWriMo I’ve learned that I work really badly with the pressure of a daily word count goal. I inevitably miss the word count on one day, and then never make it up the next day, and then that’s the end of it. I end up feeling like I have failed a big fat fail of failure. I don’t need that kind of stress in a thing I actually like doing.
I wish everyone doing NaNoWriMo all the best of luck. It’s not for me.
30 Oct 2015
Given half an opportunity I will always talk about coffee.
Coffee, First
My first coffee of the day is a cappuccino sliding toward a latte. Double espresso, and steamed milk foam. It takes some time to heat up the espresso machine, to lovingly measure and grind and tamp the coffee, and to steam the milk, but I have a lot of energy in the mornings so I don’t mind the effort. As I make this coffee the sun comes up and warms the kitchen through the window. It’s a comfortable start to the day.

I buy a variety of espressos, usually something locally-roasted, and medium to dark roast. I like the Verve Streetlevel, the Sightglass Owl’s Howl, and the Barefoot Redcab, although right now I’m working through a pound of Counter Culture’s Hologram. It’s OK.
I drink my caps with whole milk, sometimes half whole milk and half half & half. (“two thirds”?) A little turbinado sugar. In the last year I gave up eating all artificial sweeteners, including finally breaking a truly tenacious awful chewing-gum habit, but I still like a little sweet in my coffee.
For a while I was teaching myself how to do latte art, hearts and leaves, but it’s harder to do with whole milk than with low or nonfat, so I give it a half-hearted try each time but I haven’t really improved in a long while.
Coffee, Second
The second coffee of the day is a big vat of iced coffee. I have less patience for careful ritual foodmaking as the morning goes on, so something I can put together quickly is the choice here. If I’m out running errands I’ll stop at a Starbucks and get an iced Americano (hence the big branded cup). At home I usually drink cold brew.

I experimented for a while with making my own cold brew coffee, a bunch of years back (with an official “cold brew system”), and more recently (with a bowl and some cheesecloth). I’ve had fairly bad luck with it. It uses a lot of ground coffee for not a lot of brew, but more importantly it seems to always has a sour undertone to the taste that I don’t like at all.
I’ve been trying store-bought cold brews, both sweetened and unsweetened, and a lot of them have that same sour taste. Maybe that’s what cold brew is supposed to taste like? (yuck face emoji)
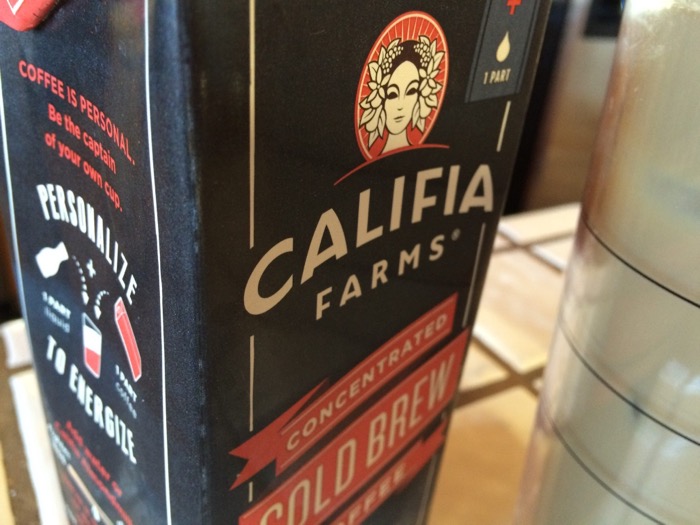
Recently I bought a big carton of Califia cold brew. Califia makes expensive high-end almond milk. They have no hipster cred in coffee at all as best as I know. But their cold brew does not have that sour taste, so I’ve been buying a lot of it.
Coffee, Third
The third coffee of the day is optional. I try not to have caffeine after noon because it messes with my sleep, and I have a lot of trouble sleeping lately (another post for another day.) So third coffee of the day is decaf. And in the theme of my requirement for a rapidly descending workload for each cup of coffee of the day, this coffee is often instant.
The Starbucks instant coffees in the little foil packets are, shockingly, not horrible. They are completely acceptable as emergency afternoon coffee, especially with milk and sugar and ice. They do have problems dissolving in cold water, so I heat up a little water and the instant coffee in the microwave.
Coffee, Fourth
I never have a fourth cup of coffee. If I did it would probably mean standing in the kitchen and emptying an entire packet of dry instant coffee mix directly into my mouth.